티스토리 뷰
2020/07/09 - [Game : 좋아하는 것/Unity] - Dodge game - 총알 피하기 게임(3)
Dodge game - 총알 피하기 게임(3)
2020/07/07 - [Game : 좋아하는 것/Unity] - Dodge game - 총알 피하기 게임(2) 3D object > Plane 선택 Plane의 Transf.." data-og-host="cannabuffer.tistory.com".." data-og-host="cannabuffer.tistory.com" d..
cannabuffer.tistory.com
저번 (3)에 이어서 바닥 회전과 게임 UI를 만들어보자.
01. 바닥 회전
> Bullet Spawner 이동
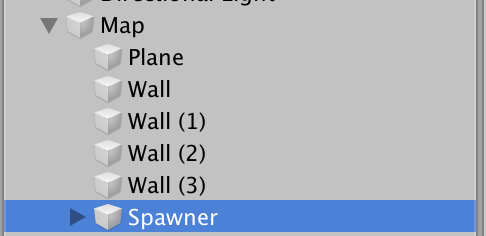
Spawner들을 묶어서 Plane과 Wall이 있는 부분으로 옮겨준다. 하나로 묶어줘야 Rotator Script를 넣어줬을 때 땅 전체가 하나로 묶여서 돌 수 있기 때문에.
> Map Rotator Script 작성
using System.Collections;
using System.Collections.Generic;
using UnityEngine;

public class MapRotator : MonoBehaviour
{
    public float speed = 8f;

    // Update is called once per frame
    void Update()
    {
        transform.Rotate(0f, speed, 0f);
    }
}
일단 코드에 관한 설명을 하자면 speed를 8로 주고 Update() 함수를 통해서 transform의 Rotate의 y 좌표에 speed의 값을 줬다. 이럴 경우에는 밑의 움짤처럼 움직인다. 호로로로로 움직임.
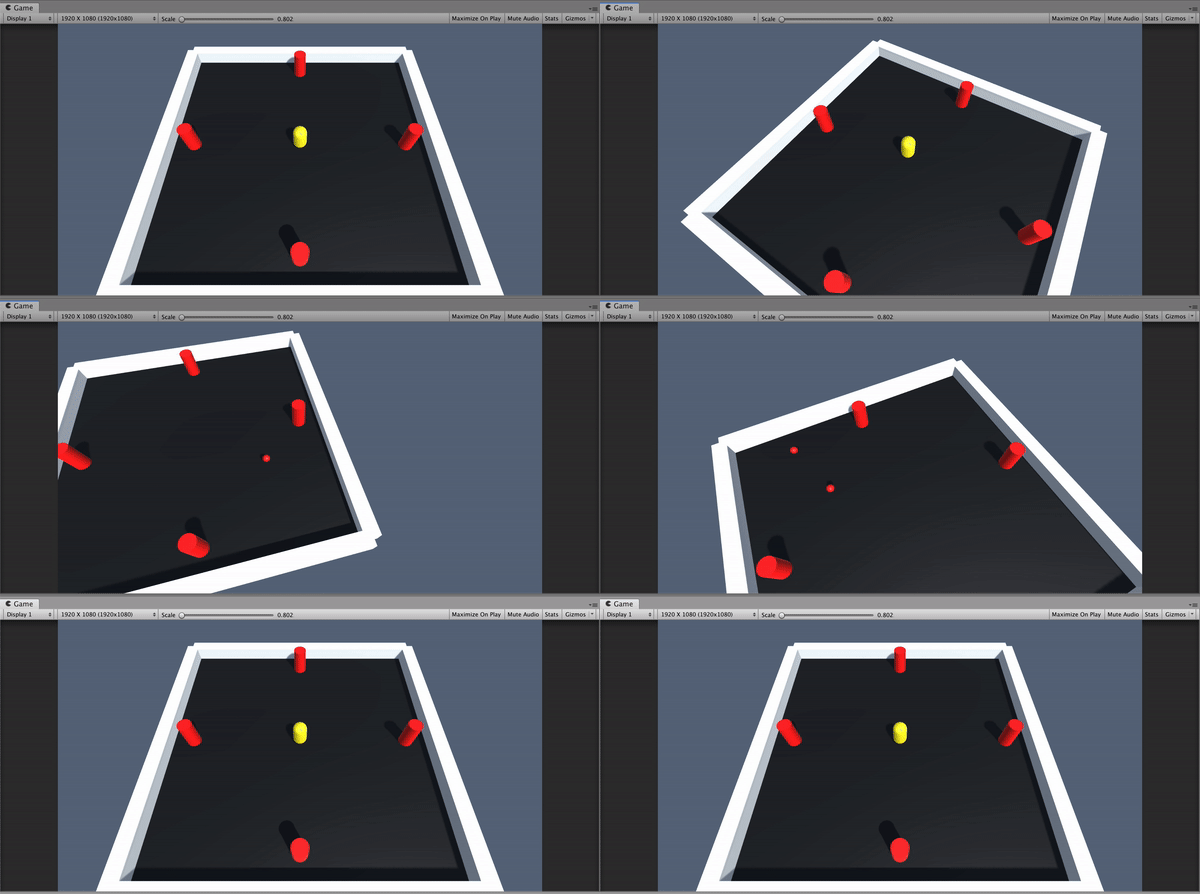
Q. 왜 저런 문제가 일어나요?
A. 이유는 간단하다 우리가 줬던 speed는 '한 번에 speed만큼 이동'을 뜻하기 때문에 빠른 speed로 움직이기 된다. 우리가 원하는 '1초에 speed(8)도 이동'을 구현하려면 Time.deltaTime을 써줘야 한다. Time.deltaTime를 사용하면 초당 프레임에 역수를 취해서 '1초에 speed도 이동'이 가능하게 된다.
(컴퓨터가 1초에 60번 게임 화면 갱신한다고 가정)
# 현재 : 8도 회전 × 1초에 60번 실행 = 총 480도 회전
# 수정 : 8도 회전 × 1초에 60번 실행 × 1/60 =총 8도 회전
> 수정된 Map Rotator Script 작성
using System.Collections;
using System.Collections.Generic;
using UnityEngine;

public class MapRotator : MonoBehaviour
{
    public float speed = 8f;

    // Update is called once per frame
    void Update()
    {
        transform.Rotate(0f, speed * Time.deltaTime, 0f);
    }
}
수정된 값을 적용하게 되면 정상적인 speed로 바닥면이 움직인다.
02. Camera Manager Script 생성
위에 바닥을 구현하고 나면 Camera를 벗어나는 곳까지 바닥면이 움직이게 되는데 Main Camera는 고정되어 있기 때문에 우리가 제대로 게임하기에 좋지 않다. 따라서 Camera를 Player에 따라 움직이게 만들어주는 Camara Manager Script를 생성했다.
> Camera Manager Script 작성
using System.Collections;
using System.Collections.Generic;
using UnityEngine;

public class CameraManager : MonoBehaviour
{
    Transform target;

    public float distance = 8f;
    public float height = 10f;

    Vector3 setPos;

    // Start is called before the first frame update
    void Start()
    {
        target = FindObjectOfType<PlayerCtrl>().transform;

        SetCameraPos();

        transform.LookAt(target.position);
    }

    // Update is called once per frame
    void LateUpdate()
    {
        SetCameraPos();
    }

    void SetCameraPos()
    {
        setPos.x = target.position.x;
        setPos.y = target.position.y + height;
        setPos.z = target.position.z - distance;

        transform.position = setPos;
    }
}
target은 다른 Object의 Transform를 가지고 오는 데사용, Vector3로 Position를 잡는다. distance와 height는 나중에 Camera의 Position를 잡는데 사용할 것이다.
Start() 함수에서는 저번과 마찬가지로 FindObjectOfType를 사용해서 PlayerCtrl를 가진 Object의 transform를 가지고 온다.
-> Player의 Position
* SetCameraPos() 함수
- setPos의 x, y, z에 Player(target)의 Position의 x, y, z값을 넣어줌
- y값은 현재 Player보다 height만큼 위에
- z값은 현재 Player보다 distance만큼 뒤에
- transform의 position를 setPos값으로 정함.
► setPos값에서 Main Camera가 Player를 찍음
* LateUpdate() 함수 : LateUpdate함수는 모든 Update함수가 실행된 다음에 실행
★ 해당 Object를 따라가는 카메라의 기능은 Update 안에서 움직이는 오브젝트를 추적하기 때문에, 항상 LateUpdate에서 수행되어야 합니다.(Unity - 스크립팅 API에 써있는 내용)
∴ 카메라가 Player를 따라 다니게 됨.

03. 화면 UI 구현
> UI Text 가져오기

Hierarchy창에서 Create > UI > Text 생성한다. 그러면 3D Object 생성과는 다른 곳에 UI Canvas가 생성된 걸 볼 수 있다.

UI Canvas가 크기 때문에 3D 상태로 보면 보기가 힘들다. 따라서 Scene에 2D 버튼을 눌러주자. 훨씬 보기 좋다.
> 텍스트 위치 조정

현재 생성된 Text이름을 'Time Counter'로 변경했다. 그리고 Anchor Presets를 누르고 Option(⌥)키를 누르면 모양이 바뀌는데 그 때 top - center 부분을 눌러주면 된다.
Q. Anchor Presets이 뭔가요?
UI 요소를 잘 배치하기 위해서는 앵커(Anchor), 피벗(Pivot), 포지션(Position) 값을 조정해야 한다. Anchor Presets은 자주 사용되는 앵커, 피벗, 포지션 값을 제공하여 UI 배치를 편하게 해주는 설정 모음 창이다.
> Text 내용 및 폰트 위치 변경
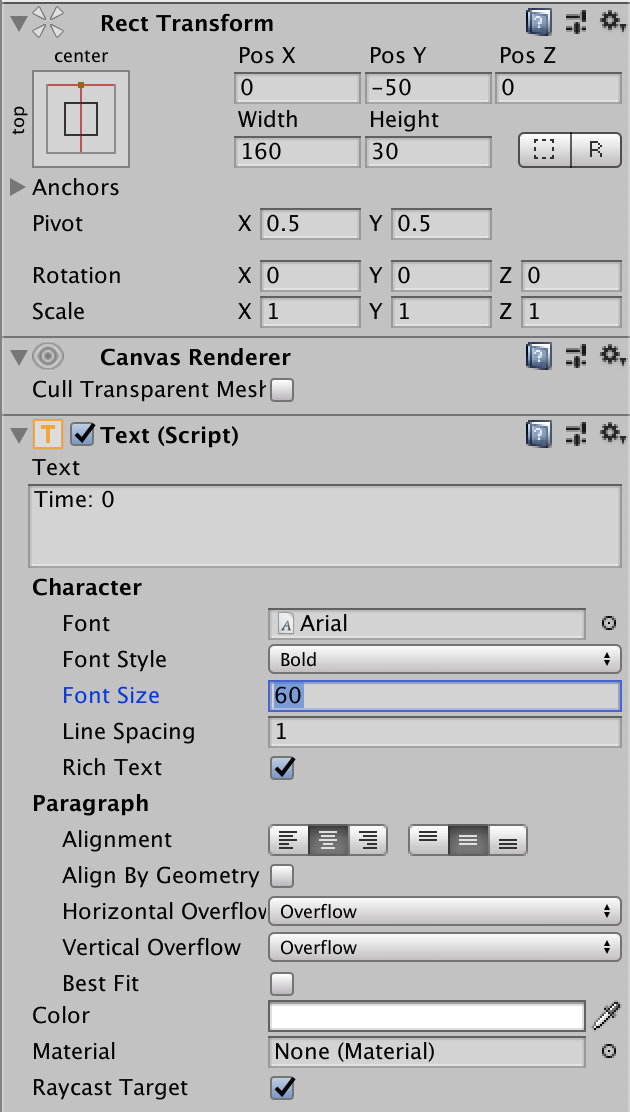
Font 내용을 Time: 0로 변경하고 Alignment를 모두 Center정렬로 설정한다. Font Size는 60, Style은 Bold로 설정했다.
★ Horizontal Overflow, Vertical Overflow를 모두 Overflow로 설정할 것! 그렇지 않으면 크기가 증가할 시 범위를 벗어난다.
> Text에 Shadow 효과 추가

Time Counter에서 Add Component를 눌러서 Shadow를 추가해준다.
> Gameover Text 추가
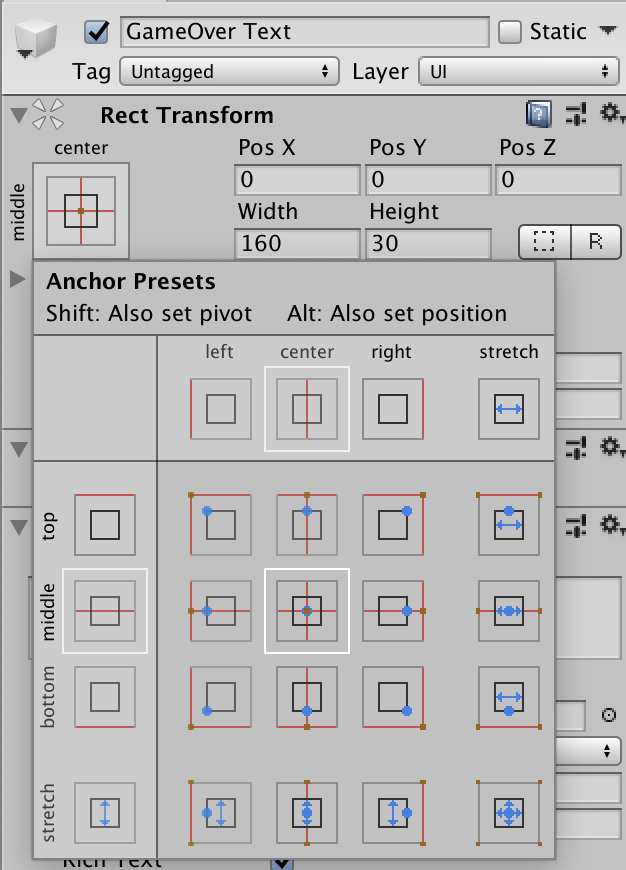
Time Counter와 같은 Canvas > UI > Text를 꺼내주고 이름은 GameOver Text로 한다. 아까와 같은 방법으로 GameOver Text가 놓일 곳을 선정한다.
> Record Text 추가

Record Text는 GameOver가 일어났을 때 Best Record를 보여줄 Text로 Text를 위에 사진과 같이 설정해줬다.

GameOver가 일어날 때 보여야 하기에 GameOver Text 밑에 두어서 묶어둔다.
> GameOver Text 비활성화
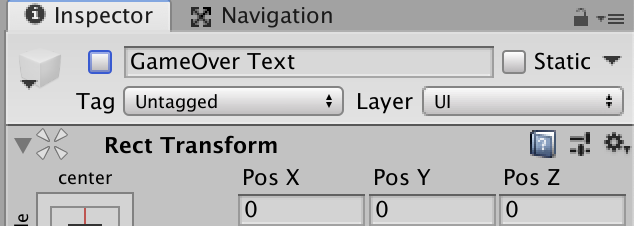
GameOver Text 이름창 옆에 선택 버튼이 선택되어 있는데, 해당 버튼은 해당 Object가 활성화되는지 비활성화되는지를 의미한다.
GameOver Text는 게임 중에는 필요없는 UI이기에 비활성화를 걸어두자.
-> 나중에 활성화되어야 할 타이밍에 활성화시킬 것
04. GameManager Script 생성
전반적인 게임의 흐름을 담당할 GameManager Script를 작성해보자.
> GameManager Script 생성
using System.Collections;
using System.Collections.Generic;
using UnityEngine;
using UnityEngine.UI;
using UnityEngine.SceneManagement;

public class GameManager : MonoBehaviour
{
    [SerializeField]
    GameObject gameOverText;
    [SerializeField]
    Text timeText, recordText;

    float surviveTime;
    bool isGameOver;

    // Start is called before the first frame update
    void Start()
    {
        surviveTime = 0;
        isGameOver = false;
    }
 }
[SerializeField]를 사용해서 GameObject와 Text를 받을 곳(Prefab)을 만든다.
* surviveTime : 현재까지 생존한 시간
* isGameOver : 현재 user가 GameOver 했는지
-> 이 둘을 Start에서 초기화 시켜준다.
   // Update is called once per frame
    void Update()
    {
        if (!isGameOver)
        {
            surviveTime += Time.deltaTime;
            timeText.text = "Time: " + (int)surviveTime;
        }
        else
        {
            if (Input.GetKeyDown(KeyCode.R))
            {
                SceneManager.LoadScene("SampleScene");
            }
        }
    }
Update에서는 만약에 isGameOver가 true일 경우에 if문이 false가 되어 동작하지 않고 else문으로 넘어가 else의 실행문들이 작동한다.
* else 문
:: GameOver상태이고 R키를 누르면 SampleScene(현재 게임을 만든 Scene)으로 넘어가게 해 준다(재실행).
* if 문
:: 시간이 지날 때마다 surviveTime과 timeText를 재설정한다.
Q. 어떻게 LoadScene를 볼 수 있나요?
A. 빌드 설정 창과 빌드 목록은 Unity에서 File > Build Settings에서 볼 수 있습니다.
   public void EndGame()
    {
        isGameOver = true;
        gameOverText.SetActive(true);

        float bestTime = PlayerPrefs.GetFloat("BestTime");

        if(surviveTime > bestTime)
        {
            bestTime = surviveTime;
            PlayerPrefs.SetFloat("BestTime", bestTime);
        }

        recordText.text = "Best Record: " + (int)bestTime;
    }
EndGame 함수는 현재 상태를 게임오버 상태로 전환하는 함수이다.
isGameOver가 true 상태면 user가 GameOver 한 상태로 게임이 끝나고 GameOverText를 SetActive(true)로 활성화시킨다.
★ BestTime를 사용해서 저장된 이전까지의 최고 기록을 가져와서 bestTime에 할당하는데, 만약 없다면 0이 할당된다.
-> surviveTime이 현재까지의 bestTime보다 크다면 surviveTime를 bestTime으로 할당하고 BestTime의 key로 새로운 bestTime를 넣는다.
Q. PlayerPrefs.SetFloat가 뭔가요?
A. PlayerPrefs는 어떤 수치를 현재 프로그램을 실행 중인 컴퓨터에 저장하고 나중에 다시 불러오는 메서드를 제공하는 Unity 내장 클래스이다. PlayerPrefs는 키-값 단위로 데이터를 로컬에 저장한다.
즉, PlayerPrefs.SetFloat( string Key name, float value )의 형식으로 저장을 하는데 Key name으로 값을 저장하고 Key가 이미 존재한다면 value를 덮어쓰기도 가능하다.
# 비슷한 함수
* PlayerPrefs.GetFloat(string key)
* PlayerPrefs.SetInt(string key, int value)
* PlayerPrefs.GetInt(string key)
* PlayerPrefs.SetString(string key, string value)
* PlayerPrefs.GetString(string key)
using System.Collections;
using System.Collections.Generic;
using UnityEngine;
using UnityEngine.UI;
using UnityEngine.SceneManagement;

public class GameManager : MonoBehaviour
{
    [SerializeField]
    GameObject gameOverText;
    [SerializeField]
    Text timeText, recordText;

    float surviveTime;
    bool isGameOver;

    // Start is called before the first frame update
    void Start()
    {
        surviveTime = 0;
        isGameOver = false;
    }

    // Update is called once per frame
    void Update()
    {
        if (!isGameOver)
        {
            surviveTime += Time.deltaTime;
            timeText.text = "Time: " + (int)surviveTime;
        }
        else
        {
            if (Input.GetKeyDown(KeyCode.R))
            {
                SceneManager.LoadScene("SampleScene");
            }
        }
    }

    public void EndGame()
    {
        isGameOver = true;
        gameOverText.SetActive(true);

        float bestTime = PlayerPrefs.GetFloat("BestTime");

        if(surviveTime > bestTime)
        {
            bestTime = surviveTime;
            PlayerPrefs.SetFloat("BestTime", bestTime);
        }

        recordText.text = "Best Record: " + (int)bestTime;
    }
}
Script를 모두 합치면 이런 모양이다.
> PlayerCtrl Die() 함수 수정
    public void Die()
    {
        gameObject.SetActive(false);

        GameManager gameManager = FindObjectOfType<GameManager>();
        gameManager.EndGame();
    }
PlayerCtrl에서 Die 했을 때 gameObject가 활성화되지 못하게만 설정해줬기에, GameManger Object를 가지고 와서 Player가 Die했을 때 바로 EndGame함수가 구동되도록 했다.
05. GameManager Object 생성

Hierarchy창에서 Create > Create Empty 해서 GameManager Object를 만들어 준다.
-> Game Over Text, Time Text, Record Text에 아까 우리가 만들었던 Canvas 아래의 Text들을 넣어준다.
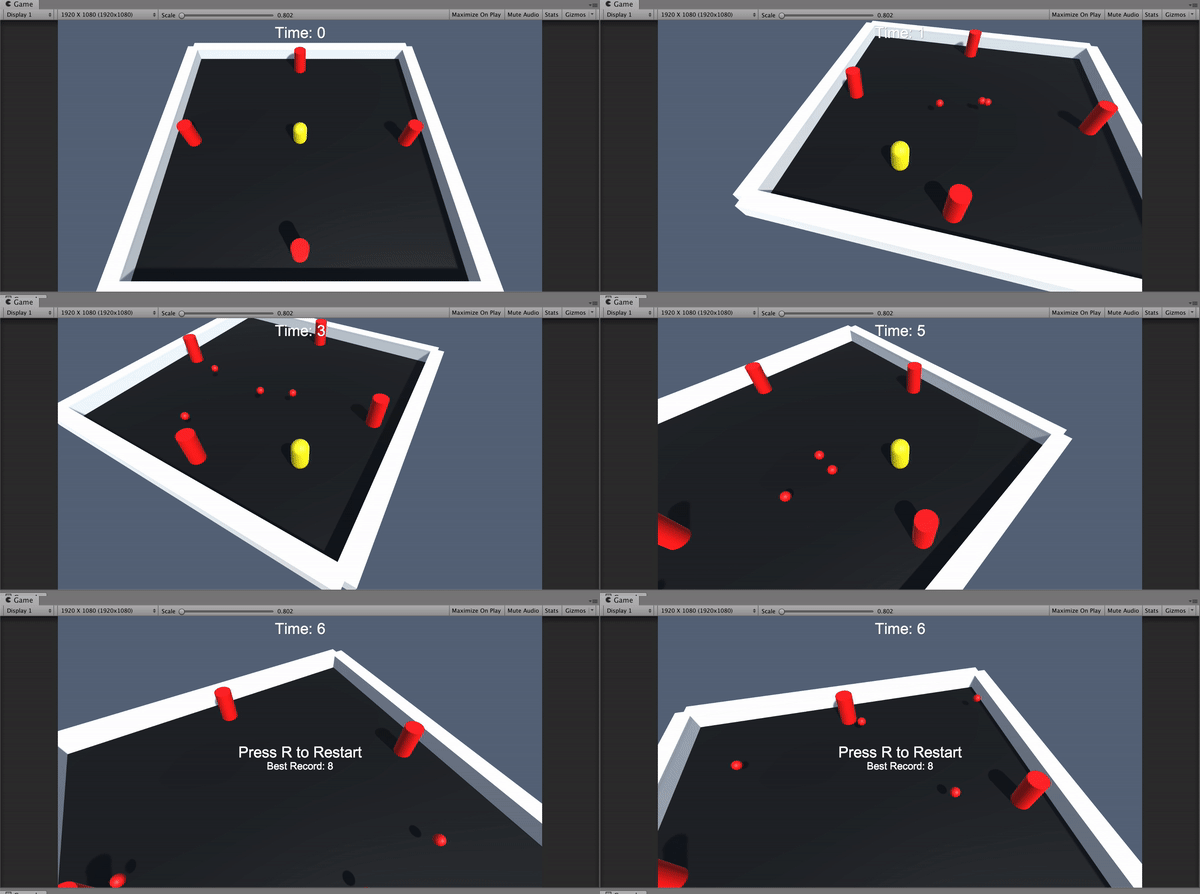
Dodge Game이 완벽하게 구현되었고, 다음엔 해당 프로그램을 빌드해보자.
'Unity' 카테고리의 다른 글
| Dodge Game - 총알 피하기 게임(최종) (0) | 2020.08.02 |
|---|---|
| Dodge game - 총알 피하기 게임(3) (0) | 2020.07.09 |
| Dodge game - 총알 피하기 게임(2) (0) | 2020.07.07 |
| Dodge game - 총알 피하기 게임(1) (0) | 2020.07.06 |
